Springboot 自学
1、快速构建一个Spring boot项目
- 对pom.xml进行修改,加入依赖项目
- 在controller控制类中加入@RestController与@RequestMapping(“/1”) RequestMapping用于对网页域名的访问,例如/1 则访问网页的域名为 LocalHost:8080/1 注:@RestController=@ResponseBody+@Controller
- 一般来说在写一个Spring boot项目时会写一个引导类Application作为SpringBoot项目的入口 添加@SpringBootApplication作为引导类,并为类命名为XXXApplication
2、Springboot起步依赖原理分析
①. spring-boot-starter-parent
1
2
3
4
5
6
| <parent>
<groupId>org.springframework.boot</groupId>
<artifactId>spring-boot-starter-parent</artifactId>
<version>2.1.8.RELEASE</version>
<relativePath/> <!-- lookup parent from repository -->
</parent>
|
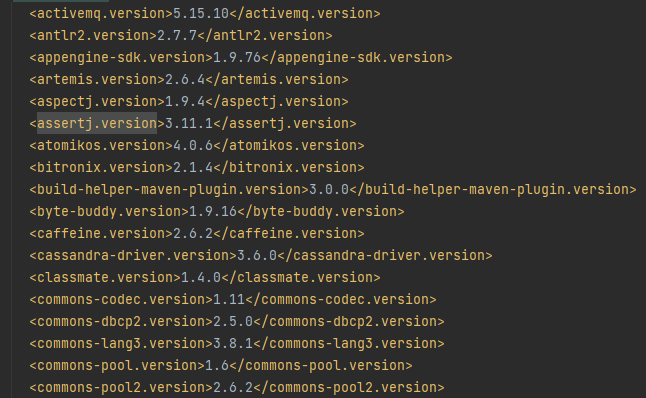
在 spring-boot-starter-parent的最高等级的类spring-boot-starter-dependencies中存在 ~ 其中写了运用到的技术的版本号

在~中用版本锁定,规定了自动引用到的依赖包,即如果在pom.xml中未定义使用依赖的版本,即spring-boot-starter-parent自动引用dependencyManagement中的依赖信息。

②. spring-boot-starter-web
1
2
3
4
| <dependency>
<groupId>org.springframework.boot</groupId>
<artifactId>spring-boot-starter-web</artifactId>
</dependency>
|
在spring-boot-starter-web其依赖于一些包,其中包括spring-web 与spring-webmvc ,就是在依赖spring-boot-starter-web时,间接依赖于spring-web 与spring-webmvc ,实现依赖传递。
⚫ 在spring-boot-starter-parent中定义了各种技术的版本信息,组合了一套最优搭配的技术版本。
⚫ 在各种starter中,定义了完成该功能需要的坐标合集,其中大部分版本信息来自于父工程。
⚫ 我们的工程继承parent,引入starter后,通过依赖传递,就可以简单方便获得需要的jar包,并且不会存在版本冲突等问题。
3、Spring boot的配置
①. 配置文件分类
SpringBoot是基于约定的,所以很多配置都有默认值,但如果想使用自己的配置替换默认配置的话,就可以使用application.properties或者application.yml(application.yaml)进行配置。
优先级propert>yml>yaml 三个配置文件的优先级顺序
②. yaml基本语法与数据格式
YAML全称是 YAML Ain’t Markup Language 。YAML是一种直观的能够被电脑识别的的数据数据序列化格式,并且容易被人类阅读,容易和脚本语言交互的,可以被支持YAML库的不同的编程语言程序导入,比如: C/C++, Ruby, Python, Java, Perl, C#, PHP等。YML文件是以数据为核心的,比传统的xml方式更加简洁。 YAML文件的扩展名可以使用.yml或者.yaml。
1
2
3
4
| server:
port: 8080
address: 127.0.0.1
name: abc
|
yaml以分隔符为界限,且注意: 分号“:”后必须要有空格来作为识别。以数据为核心,省去写标签的过程。
⚫ 大小写敏感
⚫ 数据值前边必须有空格,作为分隔符
⚫ 使用缩进表示层级关系
⚫ 缩进时不允许使用Tab键,只允许使用空格(各个系统 Tab对应的 空格数目可能不同,导致层次混乱)。
⚫ 缩进的空格数目不重要,只要相同层级的元素左侧对齐即可
⚫ # 表示注释,从这个字符一直到行尾,都会被解析器忽略。
1
2
3
4
| person:
name: zhangsan
#行内写法
person: {name: zhangsan}
|
1
2
3
4
| address:
- beijing
- hangzhou
address: [beijing,hangzhou]
|
1
2
3
| msg1: 'hello \n world' #单引号不区分转义符\n
msg2: "hello \n world" #双引号区分转义字符\n
msg3: 20
|
参数的引用
1
2
3
| name: zhangsan
person:
name: ${name}
|
③. 获取数据
1
2
3
4
5
6
7
8
9
10
11
12
13
14
15
16
17
18
19
20
| @Value("${name}")
private String name;
-----------------
#对象注入
@Value("${person.name}")
private String name2;
@Value("${person.age}")
private int age;
--------------
#数组注入
@Value("${address[0]}")
private String address0;
@Value("${address[1]}")
private String address1;
------------
#纯量注入
@Value("${msg1}")
private String msg1;
@Value("${msg2}")
private String msg2;
|
1
2
3
4
| @Autowired
private Environment env;
private name= env.getProperty("${name}"); #getproperty中的数据与上述Value中的值相同
|
1
2
3
4
| 定义一个person的类 其类中的对象需要与yaml文件中的person(name,age)名字相同
@component 注解类,提供注入
@configurationProperties(prefix = "person")如果没有prefix 直接就是@configurationProperties的话就无法成功获取到person中的内容
而是获取到从顶向下第一个与name相同字段的值 即abc
|
使用configurationProperties时,需要添加一段依赖。添加完成后在yaml文件中配置信息就有跳出提示,简便编程。
1
2
3
4
5
| <dependency>
<groupId>org.springframework.boot</groupId>
<artifactId>spring-boot-configuration-processor</artifactId>
<optional>true</optional>
</dependency>
|
④. profile
profile配置方式
-
创建多个properties文档 命名分别为application-dev、application-pro、application-test 并在其中写不同的环境配置,选择的方法在application.properties中用spring.profiles.active=XXX(pro、dev、test)
仅仅只创建一个application.yml文件,但是在不同的环境配置中用— 分隔开,并用spring:profiles:XXX来命名 并在最后用spring:
profiles: active: dev 来实现不同配置环境的选择。
1
2
3
4
5
6
7
8
9
10
11
12
13
14
15
16
17
18
19
20
21
22
23
24
| ---
server:
port: 8081
spring:
profiles: dev
---
server:
port: 8082
spring:
profiles: test
---
server:
port: 8083
spring:
profiles: pro
---
spring:
profiles:
active: dev
|
profile激活方式
虚拟机参数激活
1
| -Dspring.profiles.active=xxx
|
命令行参数激活
1
| --spring.profiles.active=xxx
|
⑤. 内部配置加载顺序
Springboot程序启动时,会从以下位置加载配置文件:
- file:./config/:当前项目下的/config目录下
- file:./ :当前项目的根目录 #指当前项目下的目录
- classpath:/config/:classpath的/config目录 #指在resource目录下再创建一个config文件 在其中写配置文件
- classpath:/ :classpath的根目录 #指原创建好了的application.properties
加载顺序为上文的排列顺序,高优先级配置的属性会生效
4、Spring boot整合其他框架
①. 整合Junit
1
2
3
4
5
6
7
8
9
10
11
12
13
14
15
16
17
18
19
20
21
22
23
24
25
26
| 微服务用@Service表明类
#实际在main中的类
@Service
public class UserService {
public void add() {
System.out.println("add...");
}
}
---------------------------------
#测试用例
@RunWith(SpringRunner.class)
@SpringBootTest(classes = SpringbootTestApplication.class)
public class UserServiceTest {
@Autowired
private UserService userService;
@Test
public void testAdd() {
userService.add();
}
}
---------------------------------
注:若测试类所在的包与被测试的类的包名相同,则@SpringBootTest(classes = SpringbootTestApplication.class)中的classes = SpringbootTestApplication.class可以删除 写为:@SpringBootTest
|
②. 整合redis
1
2
3
4
5
6
7
8
9
10
11
12
13
14
15
16
17
18
19
20
21
22
23
24
25
26
27
| 引入redis依赖
<dependency>
<groupId>org.springframework.boot</groupId>
<artifactId>spring-boot-starter-data-redis</artifactId>
</dependency>
--------------------------
@Autowired
private RedisTemplate redisTemplate;
@Test
public void testSet() {
//存入数据
redisTemplate.boundValueOps("name").set("zhangsan");
}
@Test
public void testGet() {
//获取数据
Object name = redisTemplate.boundValueOps("name").get();
System.out.println(name);
}
---------------------
#redis 配置修改
spring:
redis:
host: 127.0.0.1 # redis的主机ip
port: 6379
|
③. 整合MyBatis
1
2
3
4
5
6
7
8
9
10
11
12
13
14
15
16
17
18
19
20
21
22
23
24
25
26
27
28
29
30
31
32
33
34
35
36
37
38
39
40
41
42
43
44
45
46
| 引入MyBatis依赖
<dependency>
<groupId>org.mybatis.spring.boot</groupId>
<artifactId>mybatis-spring-boot-starter</artifactId>
<version>2.1.0</version>
</dependency>
--------------------------------------------------------------------------------------------------------------------------------
# datasource
spring:
datasource:
url: jdbc:mysql:///springboot?serverTimezone=UTC
username: root
password: root
driver-class-name: com.mysql.cj.jdbc.Driver
# mybatis
mybatis:
mapper-locations: classpath:mapper/*Mapper.xml # mapper映射文件路径
type-aliases-package: com.itheima.springbootmybatis.domain
# config-location: # 指定mybatis的核心配置文件
--------------------------------------------------
@RunWith(SpringRunner.class)
@SpringBootTest
public class SpringbootMybatisApplicationTests {
@Autowired
private UserMapper userMapper;
@Autowired
private UserXmlMapper userXmlMapper;
@Test
public void testFindAll() {
List<User> list = userMapper.findAll();
System.out.println(list);
}
@Test
public void testFindAll2() {
List<User> list = userXmlMapper.findAll();
System.out.println(list);
}
}
|

